Most local businesses running ads have exactly one conversion wired up. The contact form. Somebody fills it out, the ad platform counts a conversion, everybody nods.
Then the ad account starts doing something quietly expensive. It goes and finds you more of whatever produced that form fill, because that is the only outcome you ever told it to care about. Tire kickers count the same as a signed job. A wrong number counts the same as a $9,000 install.
You end up with a beautiful cost per lead and a business that is not making more money.
The fix is not a better ad. It is telling the ad platform what actually happened after the lead came in. This guide covers the whole thing, for both Google Ads and Meta, in two parts. Part one is lead tracking, so the platform knows a real human arrived. Part two is ROI tracking, so it knows how much money that lead turned into.
The three signals worth tracking
Every lead reaches you one of two ways, and every lead either turns into money or does not. That gives you three things to report back.
| Signal | Fires when | Value sent |
|---|---|---|
| Lead from a form | Somebody submits a form | Optional or estimated |
| Lead from a call | A tracked call runs long enough to be real | Optional or estimated |
| Customer Paid | An invoice actually gets paid | The real amount collected |
- Fires when
- Somebody submits a form
- Value sent
- Optional or estimated
- Fires when
- A tracked call runs long enough to be real
- Value sent
- Optional or estimated
- Fires when
- An invoice actually gets paid
- Value sent
- The real amount collected
The first two tell the platform "this ad produced a human." The third tells it "this ad produced money." Smart Bidding on Google and Advantage bidding on Meta can only optimize toward what you feed them, so if you stop at the first two, you have asked them to buy leads, not customers.
Seedly is built to send all three, from forms, from tracked phone calls, and from paid invoices, to Google and to Meta. Here is how to turn it on.
Part 1. Lead tracking
Step 1. Connect your ad accounts
Google Ads. Open Settings and Integrations, find the Google Business card, and connect your Google account. That single connection covers Analytics, Search Console, and Ads. Once it is connected, pick which Ads account to link. The connected user needs standard or admin access on the Google Ads account, not read-only.

Already had Google connected? Reconnect it once. Google added a new permission that server-sent conversions now require, and a connection made before that permission existed does not carry it. Nothing looks broken when this is the problem, which is exactly why it is worth ruling out now. The card still says Connected, your reports still work, and the conversions just wait instead of going through. Disconnect Google on the Google Business card, connect it again, and approve the permissions Google asks for on the way back in. Anything that was waiting gets sent once the reconnect lands. You only have to do this once.
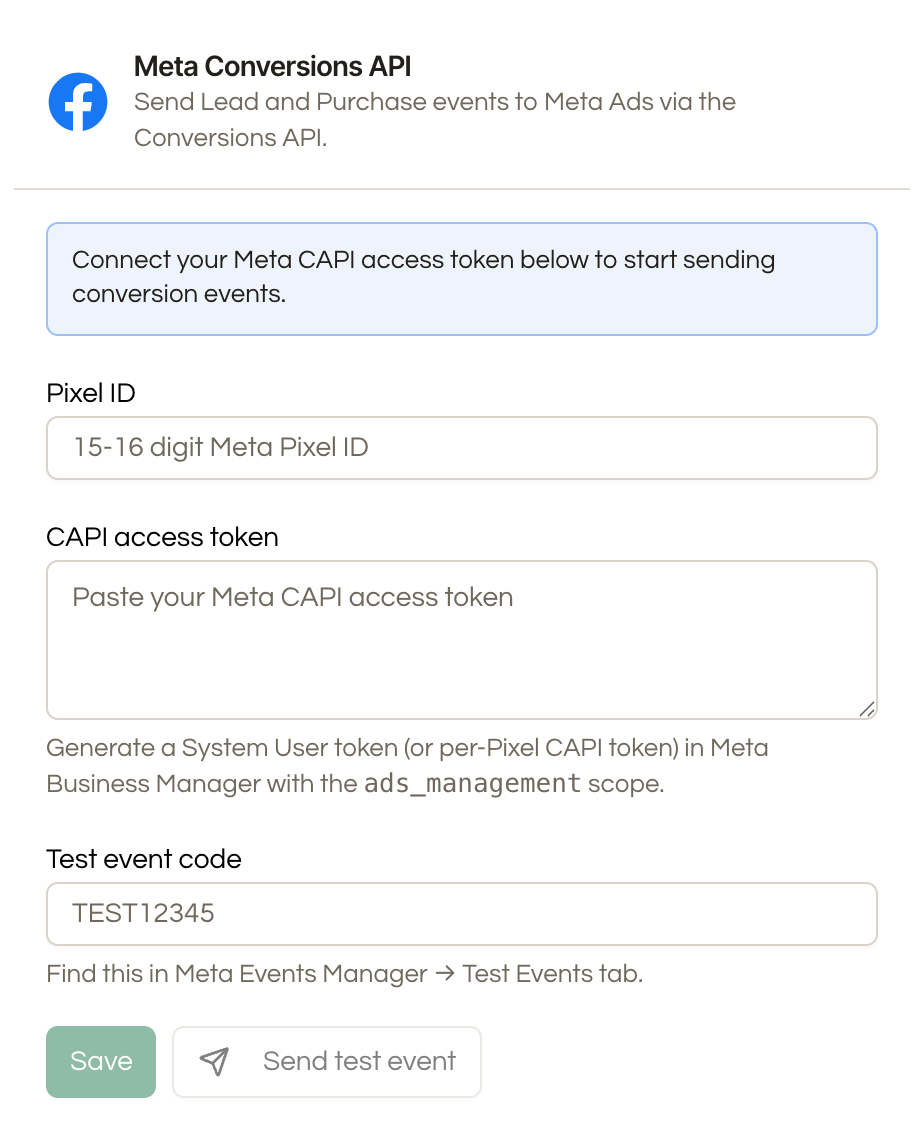
Meta. Open Settings and Integrations, find the Meta Conversions API card, and paste two values. Your Pixel ID (Meta now labels this a Dataset ID inside Events Manager, it is the same number) and a CAPI access token. Both live in Meta Events Manager under your dataset's Settings tab. Use the Send test event button to confirm the connection lands before you go further.
Step 2. Create the conversion actions
This part happens inside Google Ads and Meta, not inside the CRM, and it is where most people go wrong.
Google Ads
A conversion action is the bucket Google counts into. You create it. The CRM fires at it.
Because Seedly sends conversions from your server (not from a browser tag), you have to create the right type of conversion action. In Google Ads, go to Goals, Conversions, New conversion action, and choose Import, then Manual import using the API or uploads. This creates an offline conversion action of the type the CRM can send to.
Do not create a Website or a Phone-call conversion action. Those cannot receive server-sent conversions, and the CRM will not be able to deliver to them.
Create these before you configure anything in the CRM. A brand new Ads account has no conversion actions at all, so there is nothing for an upload to attach to and nothing for the CRM to point at. The conversion action dropdowns inside Seedly read live from the Ads account you linked, and on an empty account they come back with nothing to choose. Those dropdowns also list every conversion action in the account, Website and Phone-call ones included, so pick the Import ones you just made.
Make two.
- Lead, for form fills and qualifying calls. A good goal category here is Qualified lead or Converted lead.
- Customer Paid, for actual revenue.
While you are in the settings for each action, set the count to Every, leave the click-through conversion window at its default (Google commonly allows up to 90 days), and choose Data-driven or Last click attribution. Once you have a steady flow of paid customers, mark Customer Paid as your primary conversion so bidding targets return on ad spend.
Advertising for more than one service? You still only need these two. A single Lead action and a single Customer Paid action can be shared across every campaign and every service you run, roofing, gutters, drain cleaning, all of it. Google already reports performance per campaign, so you can see how each service is doing without a separate conversion action for each one. And because the CRM sends the real amount collected as the value, that one Customer Paid action reflects a $400 job and a $40,000 job correctly on its own, with no extra setup.
The one reason to split them is if you want to bid to a different return-on-ad-spend target per service. Then create a matching pair for each one, say a Roofing Customer Paid and a Gutters Customer Paid, set each as the primary conversion on its own campaign, and point that service's forms, call pools, and Customer Paid workflow at its matching action. It is more moving parts to keep straight, so only reach for it when the services differ enough in value that one blended target would misprice them.
[📷 Screenshot 3: Google Ads, New conversion action, the Import then "Manual import using the API or uploads" choice. Take this in your own Google Ads account.]
[📷 Screenshot 4: The Google Ads conversion action settings panel, Count set to Every and the attribution model. Take this in your own Google Ads account.]
The Google Ads account settings that let conversions through
These live in your Google Ads account, not in the CRM, and none of them announce themselves. Miss one and the CRM looks broken when it is not, so walk the list once now rather than debugging it later.
Accept the customer data terms. In Google Ads, go to Goals, Conversions, Settings, and accept the customer data terms. Do this one first. Until they are accepted, uploads come back as "Resource not found" pointed at an internal field name, which reads exactly like a bug in the software and is not one. Once the terms are accepted, Google starts returning errors that name the actual cause, which is the difference between a five-minute fix and a lost afternoon.
Turn on enhanced conversions and set the method to Google Ads API. This is what lets a conversion match on a hashed email address or phone number alongside the click ID. If the method is set to anything else, the match on contact details does not happen.
Enhanced conversions for leads is a separate setting. It has its own switch and its own gate to get through, and it covers a different case, a conversion that arrives with no click ID at all. Its setup only offers the Google tag or Google Tag Manager as the method. There is no API option in there, and going looking for one is where a lot of people lose an hour.
| Setting | What it does | When you need it |
|---|---|---|
| Enhanced conversions | Matches on a hashed email or phone alongside the click ID. Method has to be Google Ads API. | Raising match rates on conversions that already carry a click ID |
| Enhanced conversions for leads | Matches on contact details when there is no click ID. Set up with the Google tag or Tag Manager only, no API option. | Crediting leads that arrived with no click ID at all |
- What it does
- Matches on a hashed email or phone alongside the click ID. Method has to be Google Ads API.
- When you need it
- Raising match rates on conversions that already carry a click ID
- What it does
- Matches on contact details when there is no click ID. Set up with the Google tag or Tag Manager only, no API option.
- When you need it
- Crediting leads that arrived with no click ID at all
A conversion that carries a click ID needs neither of them. If the lead arrived with a gclid, gbraid, or wbraid, Google can credit it on the click alone. Get that working and confirm conversions are landing before you go anywhere near identity matching. A baseline you trust makes the next part obvious instead of guesswork.
Give a saved setting time to take. Saved is not the same as live. Google Ads showed enhanced conversions as active while uploads were still being rejected for it, so if the next upload still fails, wait around ten minutes and try again before you change anything else. Changing three settings while the first one is still catching up is how a working setup gets pulled apart.
Meta
Meta does not use per-account conversion actions the way Google does. It uses standard event names on your dataset. You do not create anything ahead of time. The CRM sends a Lead event for form fills and qualifying calls, and a Purchase event when an invoice is paid, and those events show up in Events Manager on their own.
There is no Meta equivalent of the Google Ads settings above either. Meta matches on hashed contact details automatically when you send them, which the CRM already does, so there is nothing to switch on and no terms to accept.
Step 3. Capture the click, or nothing else matters
Before any conversion can be credited to an ad, the lead has to arrive carrying the click identifier. On Google that is the gclid (plus gbraid and wbraid on newer campaign types). On Meta it is the fbclid. Without one of these, the platform has no way to tie the conversion back to the ad click, and the conversion is dropped.
Two things make sure that identifier arrives.
Turn on auto-tagging in Google Ads. In your Google Ads account settings, confirm auto-tagging is on. This is what appends the gclid to your landing page URL.
Install the tracking template. In the CRM, open Settings and Integrations, go to the connected Google card, find the Conversion Tracking section, and copy the Tracking template. Paste it into Google Ads under Settings, Account Settings, Tracking, Tracking template. This one field captures the click ID and your campaign names on every ad click, so the CRM can match conversions back to the exact campaign later.
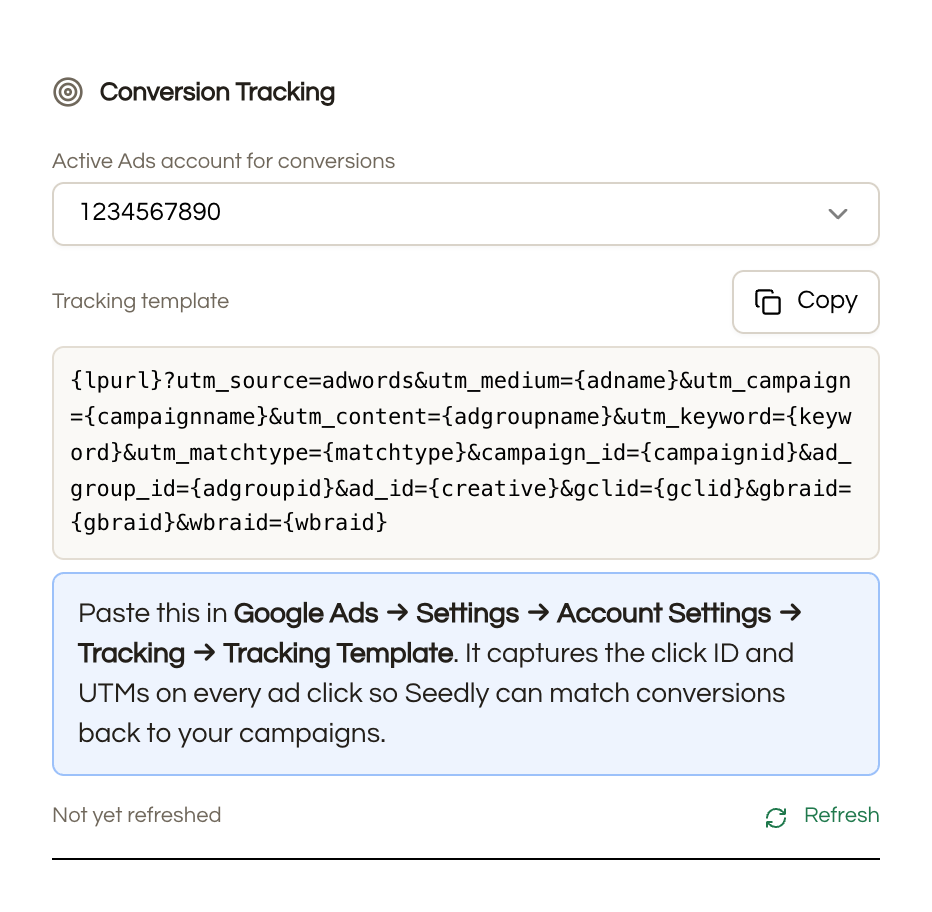
The Conversion Tracking section only appears after you have selected an active Ads account, so pick your account first if you do not see it.
Meta's fbclid rides in on the ad URL automatically, and the CRM captures it. There is no template to paste for Meta.
Step 4. Form fills
This is the easy part and it needs no automation at all.
Open the form in the builder, go to the Settings tab, and open the Tracking section. Turn on the platform you want.
- Google Ads. Turn on "Send conversion when this form is submitted" and pick your Lead conversion action from the dropdown, which is populated live from your Google Ads account.
- Meta. Turn on "Send Meta CAPI event when form submits" and leave the event name as Lead.
You can set a value override on either, or leave it blank to send no value for a lead. That is fine. Leads are counted, revenue comes later.
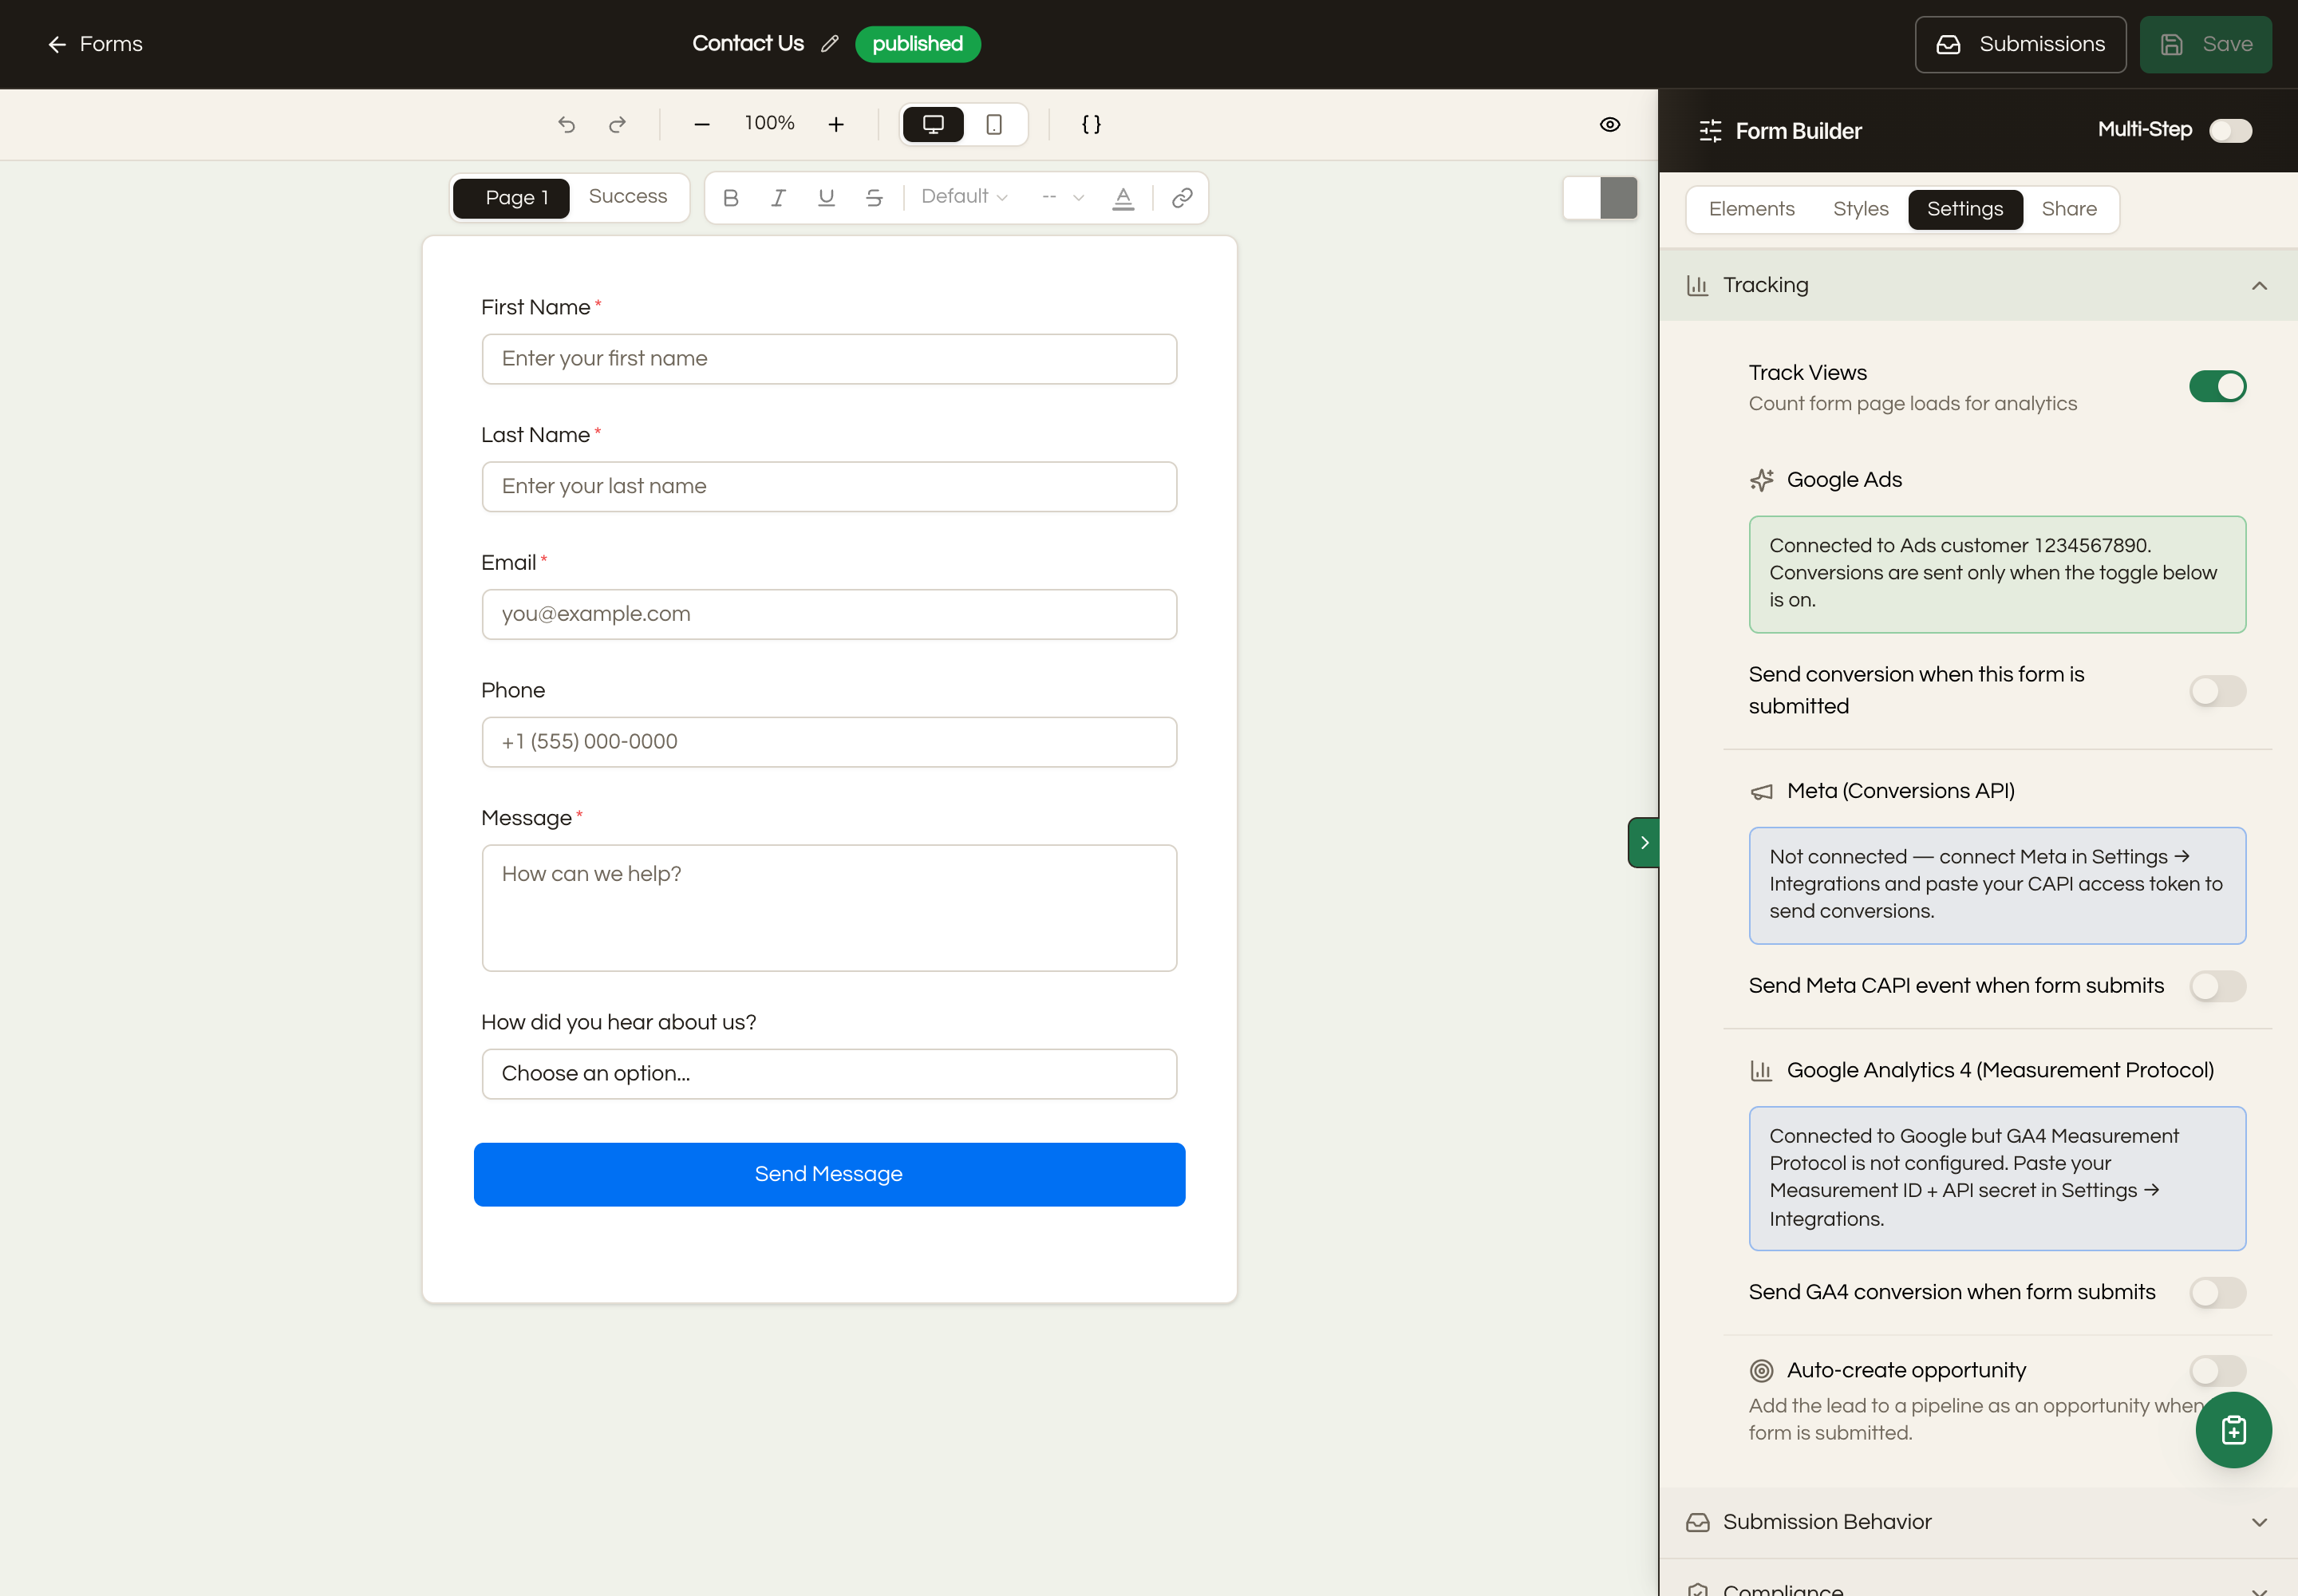
The part that matters and that you do not have to configure is the click ID. When somebody lands on your site from an ad and submits the form, the CRM reads the gclid or fbclid from the page and stores it on the new contact. That is what lets a conversion three weeks from now still get credited to the ad click that started it.
The first time you turn on tracking for a form, Seedly asks if you want to auto-create an opportunity when that form is submitted. Say yes. The opportunity is what carries the ad click all the way through to the paid sale, and Part 2 explains exactly why that matters. You only answer this once per form.
One important note about embedded forms. If you embed a Seedly form on your own website, re-copy the embed code from the form's Share panel after setting this up. The current embed code passes the ad click details from your page through to the form. An older embed does not, and a lead that comes through it will look like it came from nowhere. Forms hosted on the Seedly page already capture everything.
Step 5. Phone calls, and why you need dynamic number insertion
Here is where most setups quietly fall apart.
If the same phone number sits on your website for every visitor, a phone call is an anonymous event. Somebody called. You have no idea whether they came from an ad, a Google Maps listing, or a fridge magnet from 2019.
Dynamic number insertion fixes that by swapping the number on the page depending on who is looking at it. Ad traffic sees one number, organic traffic sees another. Because the number is different, the call itself carries the attribution.
Setting it up takes a few pieces. Open Settings and Integrations, click the Configure Telephony card, and go to its Tracking tab.
Turn on call tracking, then create a tracking pool and assign several phone numbers to it. Four or more numbers gives the most accurate visitor-level attribution.
Set the match rules so the pool applies to the right visitors. You can match on the Google click ID being present to catch all Google Ads traffic, on the Facebook click ID for Meta, or on any UTM combination for a specific campaign. Pools are checked in priority order, and you can flag one as the default so visitors who match nothing still see a sensible number.
Turn on DNI, enter the Website URL where the script runs (this now registers your site for number swapping, no developer needed), and give it a CSS selector pointing at the element that holds your phone number.
Set the Original Number. This is the number currently published on your website, the one the script is there to replace. Do not skip this field. Without it the CRM cannot build the current embed code and gives you an older one instead, and the older script swaps the number on the page but records nothing about the visitor who saw it, so no call conversion can ever fire. It is the single easiest way to end up with call tracking that looks installed and reports nothing. (If you have set a default original number for the whole sub-account, the pool falls back to that, but setting it on the pool is the safe habit.)
Now grab the embed code from the pool's Get embed code button and put it on your site. With the Original Number filled in you will see the current version marked as recommended, which is the one to copy.
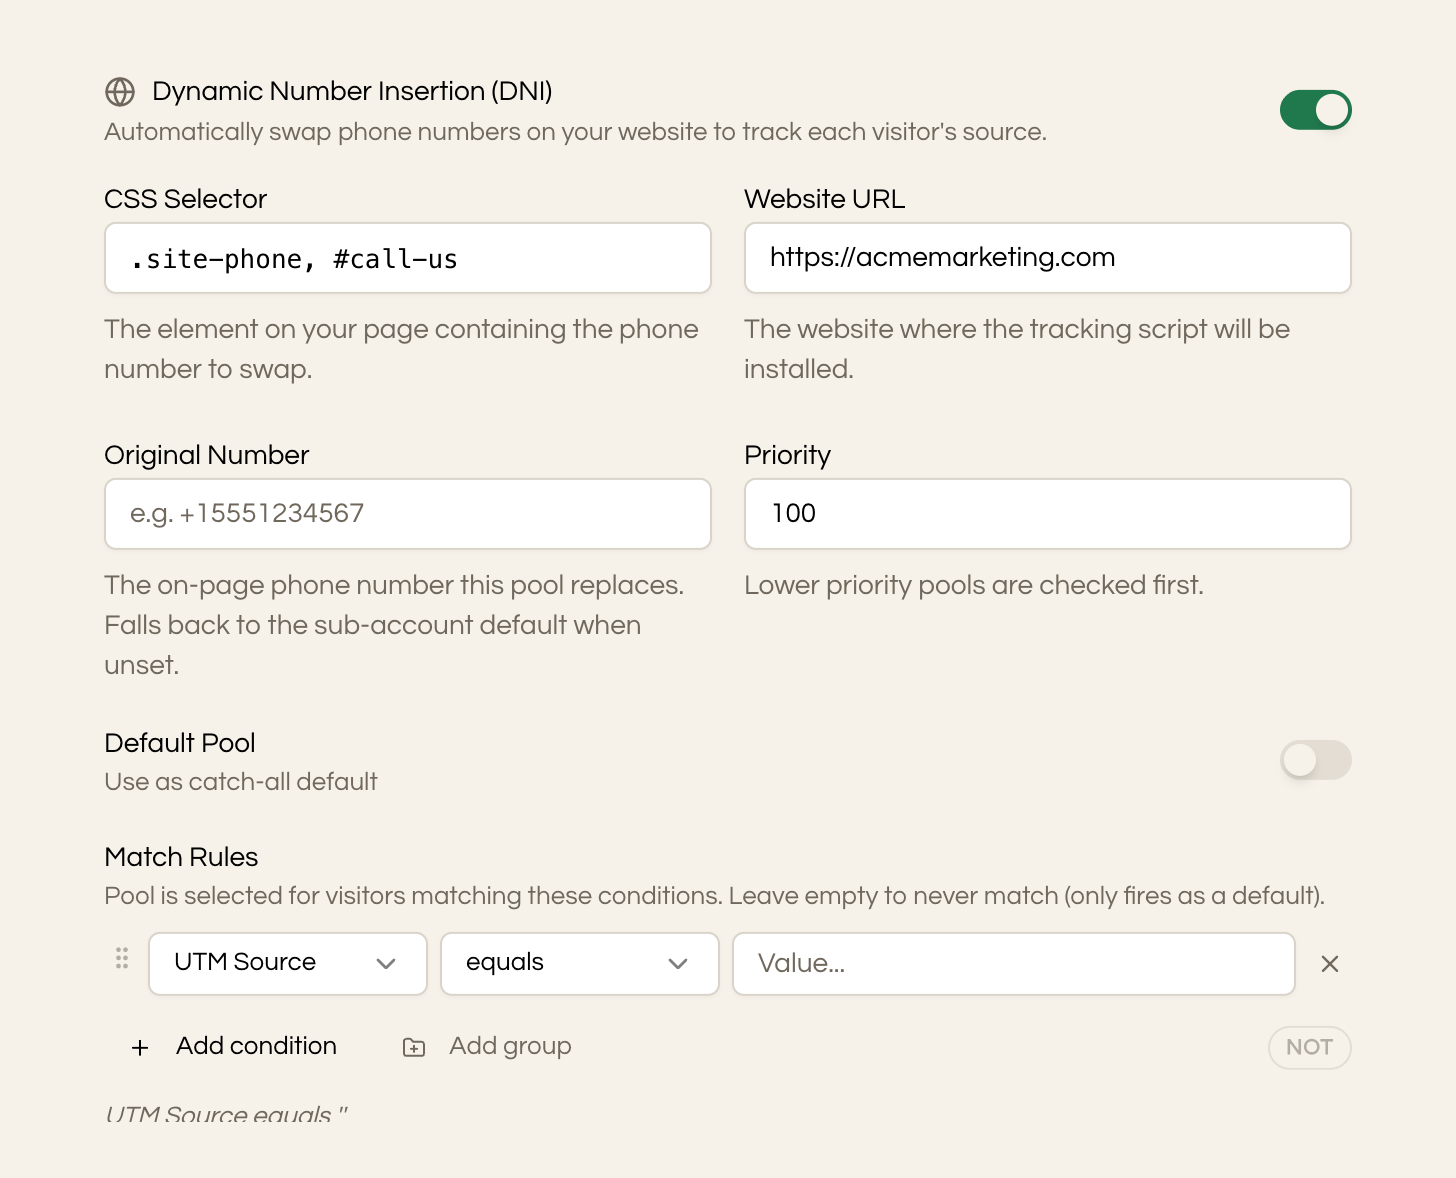
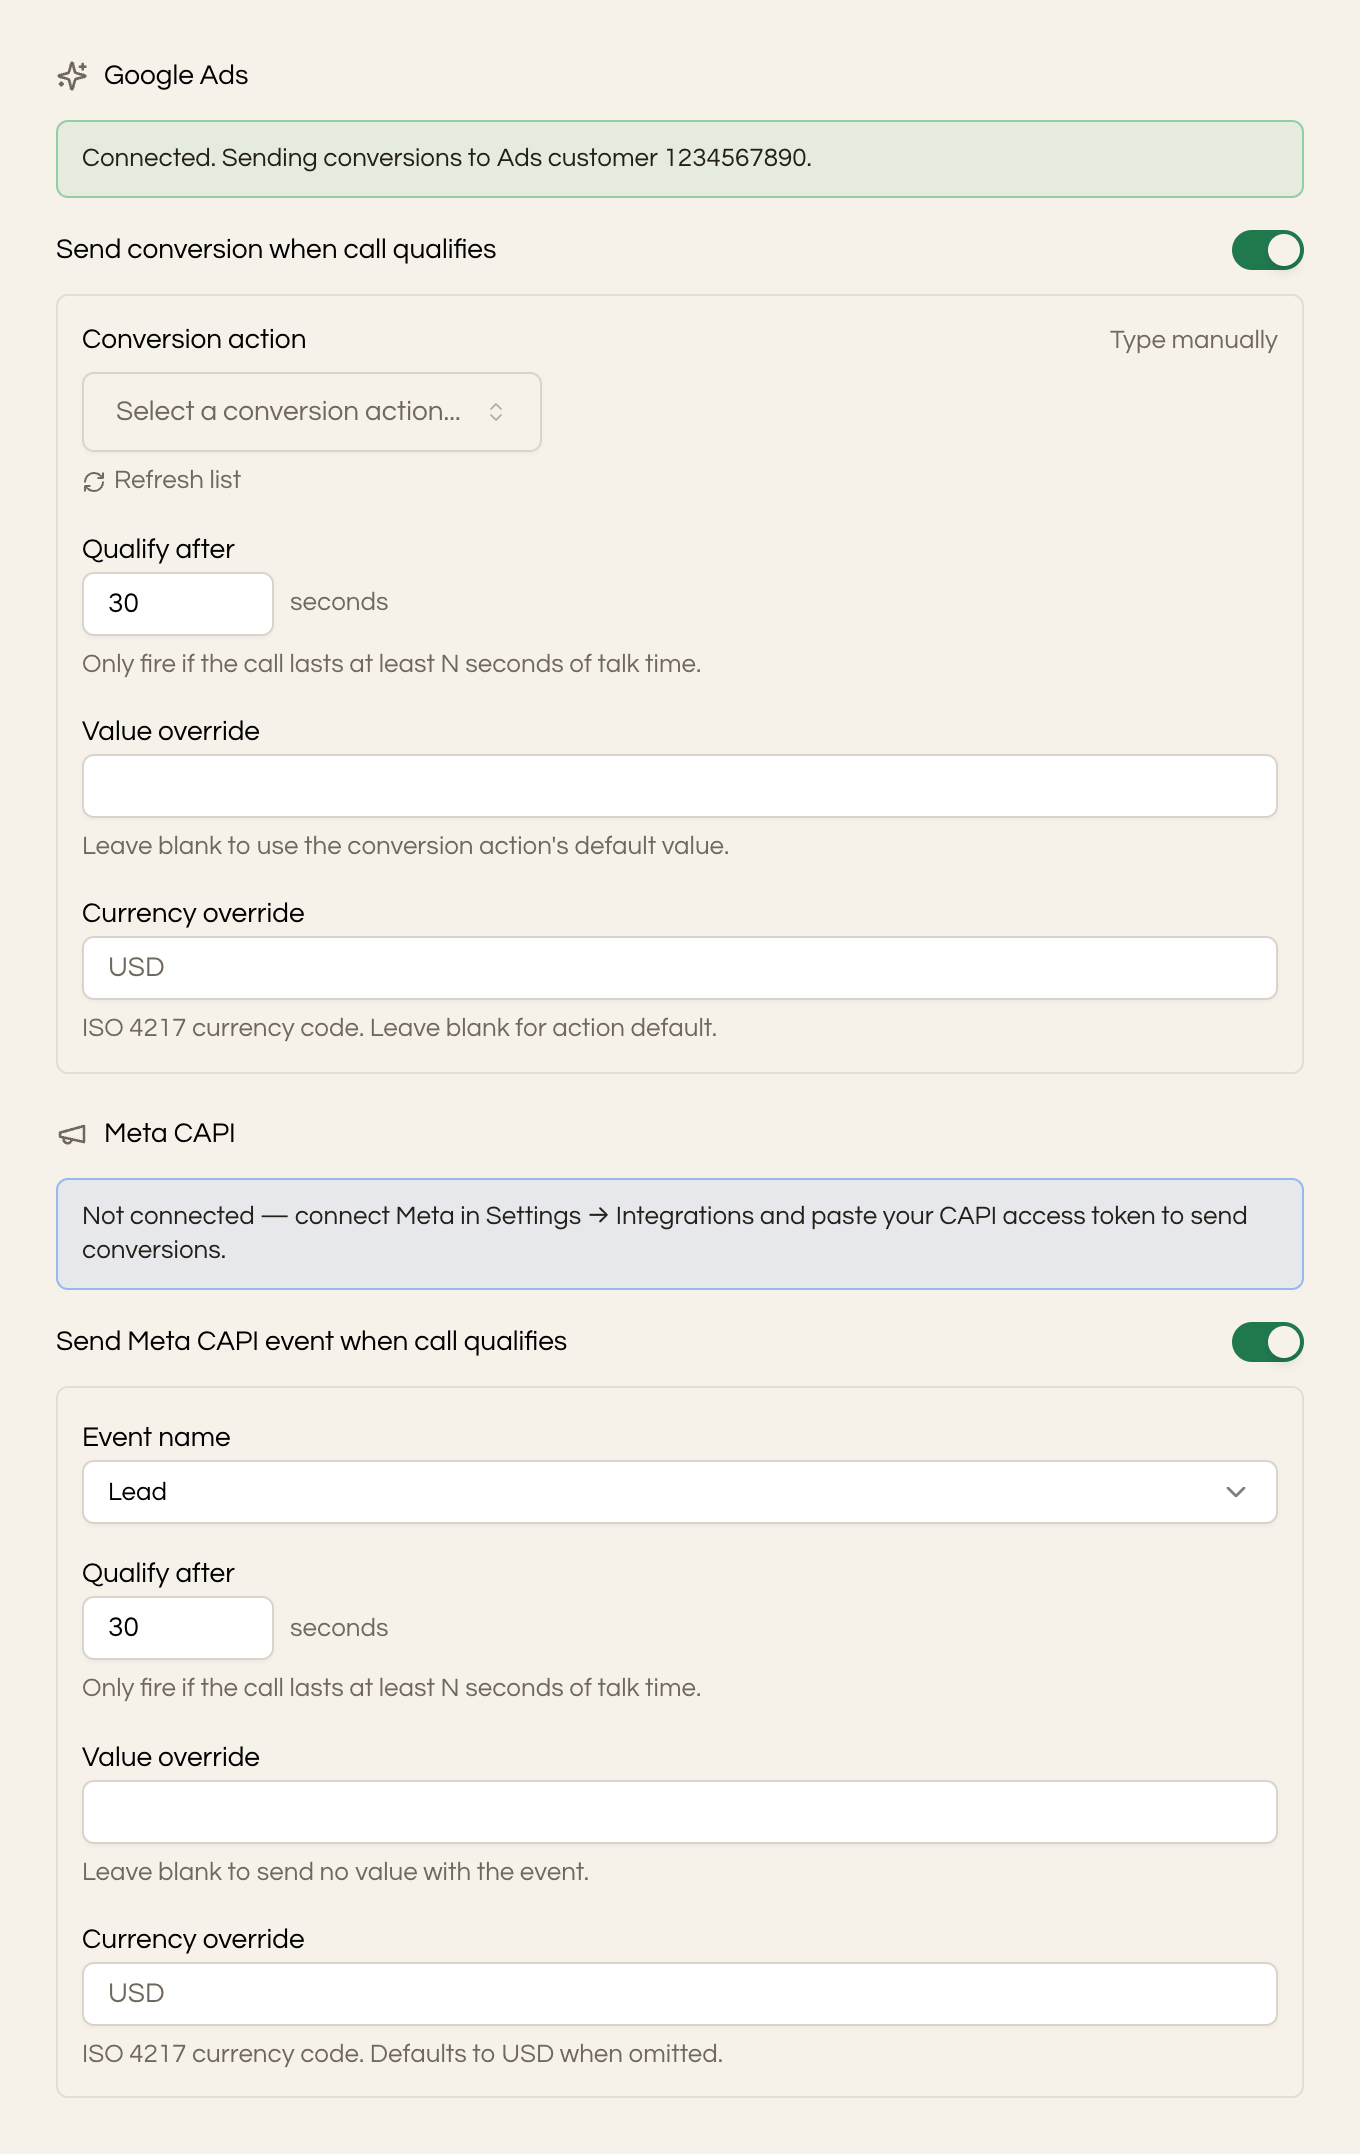
Then turn on conversion tracking for the pool. You get both platforms here too.
- Google Ads, "Send conversion when call qualifies", pick your Lead conversion action.
- Meta CAPI, "Send Meta CAPI event when call qualifies", event name Lead.
Both have a Qualify after setting measured in seconds. This part is worth caring about. Without a duration threshold, a two-second misdial reports as a conversion and you have taught the platform that wrong numbers are a good outcome. Pick a length that means a genuine conversation for your business and let short calls fall through.
Part 2. ROI tracking (closing the loop)
Everything up to now still only reports leads. This part is the one almost nobody does, and it is the one that changes what the ad platform actually buys.
The Customer Paid workflow
There are two ready-made workflows for this, one called Google Ads, Customer Paid (revenue tracking) and one called Meta CAPI, Customer Paid (revenue tracking). A sub-account created since these landed gets both automatically, switched off and sitting in draft, waiting on you.
Open your Workflows list and look for them before you go any further. A sub-account older than the feature will not have them, and no amount of hunting will turn them up. You are not missing something. In that case build each one from the template instead. Open Create Workflow, then Use a Template, and pick it out of the dropdown by the same name. It arrives in draft exactly like the seeded copy. If you run several sub-accounts, ask whoever administers your CRM to backfill them all at once rather than doing this by hand.
The shape of each is two steps. An invoice gets paid, and a conversion fires. The value it sends is not a guess or a flat number. It is the amount actually paid, including tip, late fees, and processing fees, pulled straight from the invoice that just got paid, along with its currency.
To turn on the Google one, open it, pick your Customer Paid conversion action in the node, and switch it from draft to published. To turn on the Meta one, open it, confirm the event is Purchase (the default), and publish it. That is the whole job.
These fire on every paid invoice, not just the first sale to a customer. A repeat buyer's second and third purchases each send their own revenue conversion with their own amount, so a customer who comes back is worth what they actually spent, not counted once and forgotten. It also does not matter how the payment was recorded. A card charge, a cash or check payment you mark as received, or the final payment on an installment plan all fire the same conversion.
They stay in draft until you activate them, which is deliberate, because a workflow firing at nothing is worse than one that never ran.
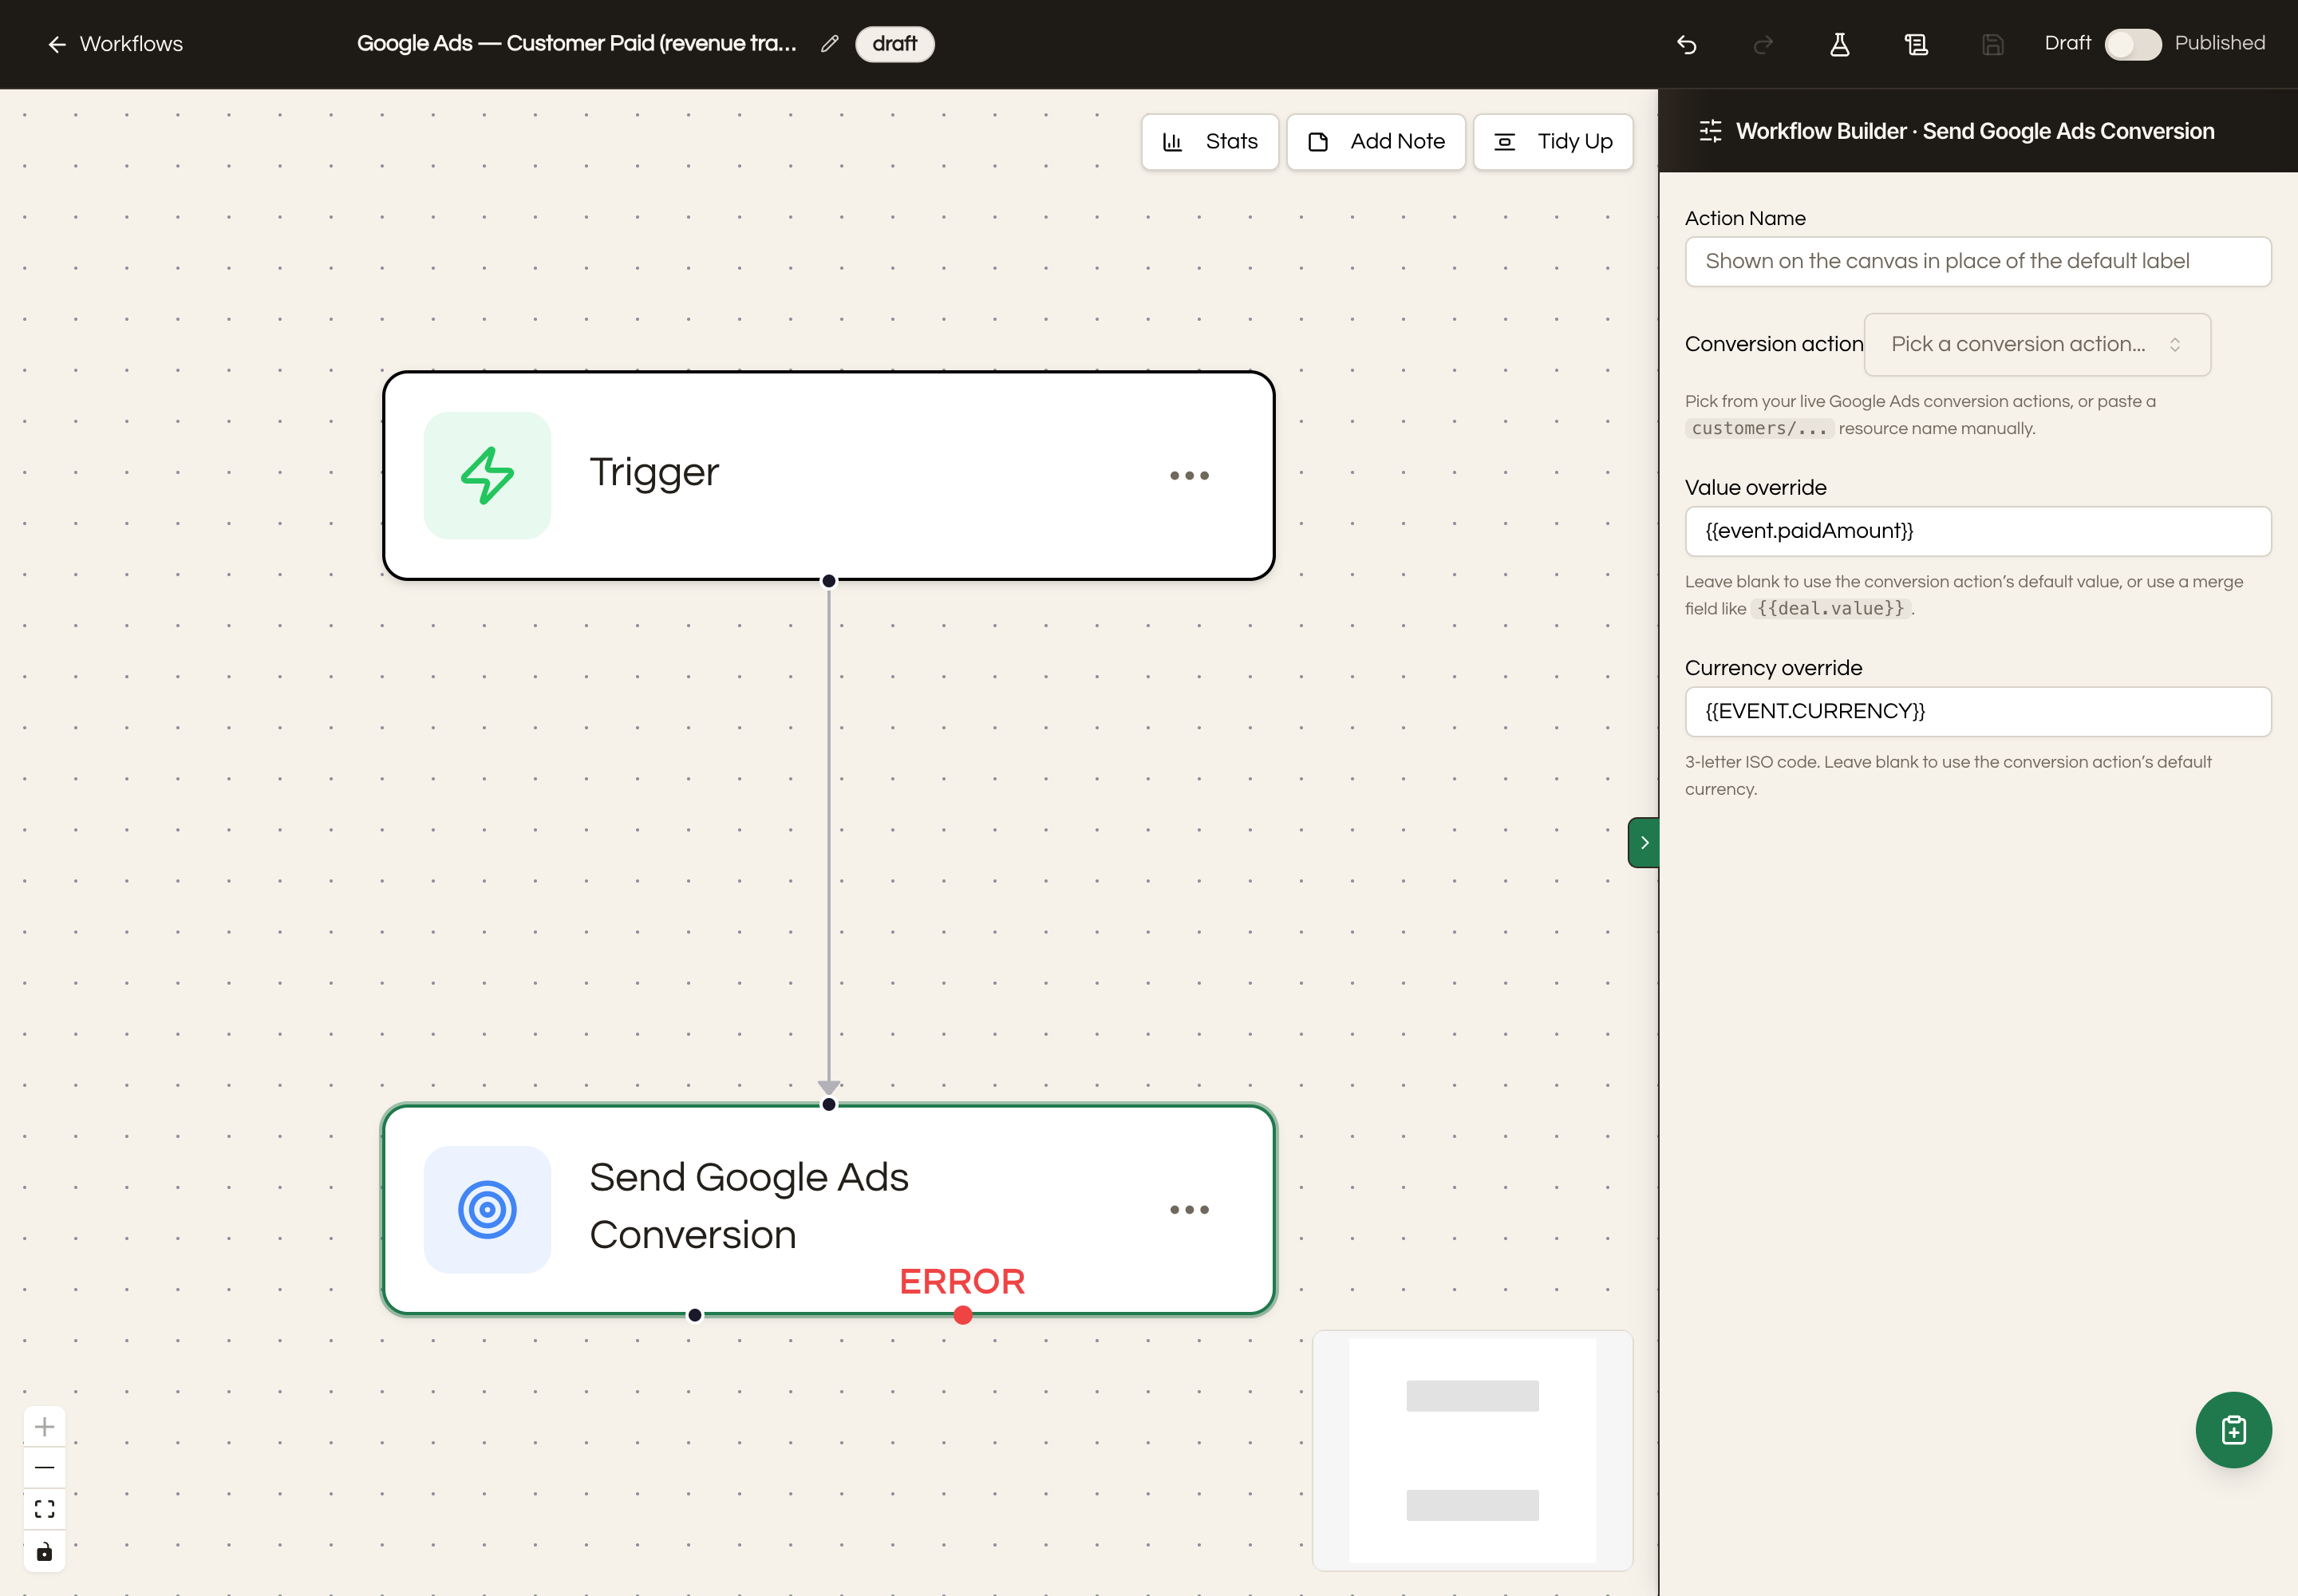
Now the loop is closed. Google sees the ad click, the lead, and the $9,000 that showed up eleven days later, and it can go find more clicks that look like that one. Meta gets the same Purchase signal against the same visitor.
How the money finds the ad click, weeks later
When an ad lead fills out your form and an opportunity is created, the CRM saves that visit's ad click onto the opportunity itself, frozen in place. When you bill that sale, create the invoice from the opportunity. When the invoice is paid, the workflow reads the click that is saved on the deal and sends the paid amount to the platform, tied to that exact click. You do not have to do anything to connect them beyond billing from the opportunity. The CRM keeps the thread.
Saving the click on the deal is what keeps a sale honest over time. A repeat customer clicks more than one ad across the months you work with them, and a busy contact can have several deals running at once. Because each deal holds the click that started it, the payment on one deal credits the ad that produced that deal, not whichever ad the person happened to click most recently. If an invoice is not linked to an opportunity, the workflow falls back to the contact's most recent click, which still works but is only as precise as last touch. That is why billing from the opportunity is the habit worth keeping.
A note on Meta, because it works a little differently
Meta's Conversions API sends events from the server, which is exactly what the CRM does after a form is accepted or an invoice is paid. That is the modern, recommended way, and it is more durable than a browser pixel that iOS and ad blockers keep degrading.
For a lead-generation business, the cleanest setup is to let the CRM own the conversion events (Lead and Purchase) through the Conversions API, and, if you also run a Meta Pixel on your website, use that Pixel only for top-of-funnel signals like page views and for building retargeting audiences. Do not fire Lead or Purchase from both the browser Pixel and the CRM for the same event, or Meta may count it twice. Keeping the conversion events on the CRM side and the page-view signals on the Pixel side means there is no overlap and nothing to deduplicate.
The CRM sends hashed email, phone, name, city, state, and zip with every Meta event, plus the fbclid when it is present, which is what gives Meta enough to match the event to a real person.
A few things that will bite you
Double counting on Google. Forms, workflows, and call pools are tracked separately on purpose, so one lead can trigger more than one signal without inflating your numbers. You do not need to build guards against it.
Reconnecting Google. Google occasionally updates the permissions it requires to receive conversions. If your Google conversions stop appearing and nothing else changed, reconnect Google from Settings and Integrations before you start tearing the setup apart.
Accepted is not matched. When the CRM sends a conversion and the platform accepts it, that means the request landed, not that it was matched and counted. Both Google and Meta show the matched result in their own dashboards a day or two later. Judge the setup there, not on the instant the CRM fires.
The lag is real. Revenue conversions land whenever the invoice gets paid, which might be well after the click. That is the whole point of offline conversion tracking, but it does mean the numbers in your ad account keep filling in behind you. Judge a campaign on a window that has had time to settle rather than on yesterday.
What changes once it is running
You stop optimizing for the cheapest lead and start optimizing for the most profitable one. Those are frequently not the same campaign, and until the revenue signal is flowing you have no way of knowing which is which.
Most accounts discover the cheap-lead campaign they were proud of produces almost nothing, and the expensive one they nearly paused pays for everything else.
You cannot see that with a form-fill conversion. That is the whole reason to do the rest of it.